• Skip to primary navigation
  • Skip to main content
  • About
  • Projects

Self-Directed Reality

Actions are greater than Thoughts

  • Archive of My Thoughts

python

Python Password Generator – Philadelphia Museum of Art

July 9, 2022 by Paris

Overview

In the Automated* VPN Account Management post, I stated that I created a VPN Password Generator using Python. This section is a quick look at that project and code in detail.

I am a new programmer and I am only on Day 8 of Dr. Angela Yu’s 100 Days of Code – The Complete Python Pro Bootcamp for 2022 course as of the time of this writing.

Suffice it to say that I learned a lot so far and learned even more putting this password generator together, especially with all of the tools and packages used that the course didn’t cover yet.

Solution

Step One – Goal and Resources

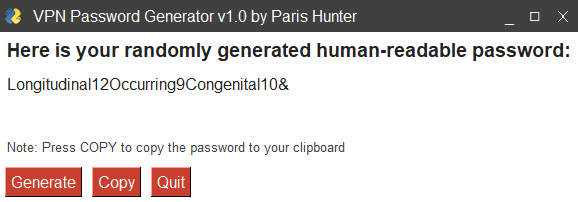
The goal of this VPN password generator is to randomly select 3 words from a set of 61000+ English words, counts the letters in each word, and randomly adds a compatible sign to the final string to generate a human-readable password. 

In addition, I created a GUI using PySimpleGUI and created a windows-based executable using PyInstaller so the program can be packaged and run locally on Windows devices in the Museum for easy password creation.

Here is a video of the Windows program in action, showing off the Generate, Copy, and Quit buttons working along with the Always on Top modifier enabled.

41 second video of the VPN Password Generator and Features

Additional Features include:

  • The ability to generate a new password just by clicking ‘generate’
  • The ability to copy the password to the clipboard using pyperclip clipboard
  • Always on top so the window can be closed at anytime
  • A color scheme that matches the design of the Philadelphia Museum of Art’s website. I even used the closest font I could find to match the layout.

List all of the resources I used for this project:

  • Python 3
  • Visual Studio Code
  • pyperclip
  • english_words
  • PySimpleGUI
  • PyInstaller
  • virtual environments (venv)
  • pip install packages and modules

Step Two – My Project Code

Here is my Python code for this project:
And yes I comment. I mean why wouldn’t I? Have you SEEN the rest of the projects on this site? 😂

# VPN Password Generator - Version 1.0
# This VPN password generator randomly selects 3 words from a set of 61000+ words, counts the letters in each word, and randomly
# adds a compatible sign to the final string.  
# Created by Paris Hunter www.parisdhunter.com

import random

# Imports Pyperclip to use to push the generated password to the clipboard
import pyperclip as pc

# Imports english-words 1.1.0 by Matt Wiens with 61000+ English words.
import english_words 

# Imports PySimpleGUI by MikeTheWatchGuy to create the interactive window
import PySimpleGUI as sg 

# This is the list of English words with lower case letters and no punctation stored in a set
# converted to a list for the random module to work

word_list = list(english_words.english_words_lower_alpha_set)

# The following signs are password friendly on most systems
signs = ['!', '#', '$', '&', '*']

# Randomly select word number one from the list, capitalize it and count the number of letters within the word
word_one = random.choice(word_list).capitalize()
length_one = len(word_one)

# Randomly select word number two from the list, capitalize it and count the number of letters within the word
word_two = random.choice(word_list).capitalize()
length_two = len(word_two)

# Randomly select word number three from the list, capitalize it and count the number of letters within the word
word_three = random.choice(word_list).capitalize()
length_three = len(word_three)

# Randomly select a sign from the sign list
chosen_sign = random.choice(signs)

# Combines all of the above into one string to use as the VPN password.
vpn = (f"{word_one}" + f"{length_one}" + f"{word_two}" + f"{length_two}"
 + f"{word_three}" + f"{length_three}" + f"{chosen_sign}")

# This is new PMA Theme
sg.LOOK_AND_FEEL_TABLE['PMA'] = {'BACKGROUND': '#FFFFFF',
                                        'TEXT': '#222222',
                                        'INPUT': '#339966',
                                        'TEXT_INPUT': '#000000',
                                        'SCROLL': '#99CC99',
                                        'BUTTON': ('#FFFFFF', '#C93F2E'),
                                        'PROGRESS': ('#D1826B', '#CC8019'),
                                        'BORDER': 1, 'SLIDER_DEPTH': 0,                                         
'PROGRESS_DEPTH': 0, }                                        

# This changes the theme of the window to match the PMA design styles.
sg.theme('PMA')

# Define the window's contents
layout = [[sg.Text("Here is your randomly generated human-readable password:", font= ('Avenir', 14, 'bold'))],
          [sg.Text(vpn, font= ('Avenir', 12), key='-OUTPUT-')],
          [sg.Text(size=(40,1),font= ('Avenir'), key='-OUTPUT-')],
          [sg.Text("Note: Press COPY to copy the password to your clipboard", font= ('Avenir', 10), text_color= '#404040')],
          [sg.Button('Generate', font= ('Avenir')), sg.Button('Copy', font= ('Avenir')) , sg.Button('Quit', font= ('Avenir'))]]

# Create the window
window = sg.Window('VPN Password Generator v1.0 by Paris Hunter', layout, use_custom_titlebar= 'true',titlebar_background_color= '#404040', keep_on_top= 'True', element_padding= 5,)

# Display and interact with the Window using an Event Loop
while True:
    event, values = window.read()
    # See if user wants to quit or window was manually closed
    if event == sg.WINDOW_CLOSED or event == 'Quit':
        break
    elif event == 'Generate':
        word_one = random.choice(word_list).capitalize()
        length_one = len(word_one)
        word_two = random.choice(word_list).capitalize()
        length_two = len(word_two)
        word_three = random.choice(word_list).capitalize()
        length_three = len(word_three)
        chosen_sign = random.choice(signs)
        vpn = (f"{word_one}" + f"{length_one}" + f"{word_two}" + f"{length_two}"
 + f"{word_three}" + f"{length_three}" + f"{chosen_sign}")
    # Updates the VPN password every time the 'generate' button is pressed
        window['-OUTPUT-'].update(vpn)
    
    # Copies the VPN password to the clipboard every time the 'copy' button is pressed
    elif event == 'Copy':
        pc.copy(vpn)

# Finish up by removing from the screen
window.close()

Future Features

If I was going to work on this in the future, there are a few things I would change:

Icon on Titlebar – Change the icon on the Title bar from the Python logo to a custom logo. I did the work to create a custom logo but I couldn’t get the image to display. I could have used an ICO file type but I wanted cross-platform compatibility (for Mac OS) so I ended up attempting Base64 to make the logo work. It didn’t work out for me and PySimpleGUI this time.

Icon on Windows Taskbar – There is NO icon on the Windows Taskbar to show that the program is even open/running so I that’s one reason why I made it ‘Always on Top’ so I (or another user) can’t lose it.

Icon on the Exe – The icon on the EXE was placed by Pyinstaller and it is simply a snake on a floppy disk. I am sure I could change those options when building the distributable, but it literally was my first time using it. And in addition, I would change the metadata about the project (creation date, version, etc ) as well.

Automated VPN Account Management – Philadelphia Museum of Art

July 9, 2022 by Paris

Brief/Challenge

As the Museum moves to a mobile-first environment brought on by the Pandemic, managing the Virtual Private Network (VPN) became my responsibility. I handled all the account creation, troubleshooting, password resets, connection issues and everything else associated with the VPN accounts on our Dell laptops.

However, the process for managing the VPN account became a little more challenging due to the competing workloads. Some requests would come through our Spiceworks ticketing system, emails, chats in Microsoft Teams, face to face, and even phone calls.

And of course, if an account was modified, no record existed of when and what was performed to the account. I quickly moved into action to streamline this process, not just for me but also for the current and future members of the IT department.

Solution

Step One – Assessment

Returning to an old standby, I created another Microsoft Form, this time with only 3 simple questions with the understanding that only those in the IT department will be filling out this form so it can be short and sweet. Currently, there are NO plans to share the VPN passwords with end users so it helps to have a central place for requests AND a central place to confirm previous passwords and/or VPN account status.

  1. What would you like to do?
    1. CREATE NEW VPN  Account
    2. CHANGE a password for VPN account
    3. DELETE a VPN account
  2. What is the FIRST NAME on the VPN account? (before the period in the email address)
  3. What is the LAST NAME on the VPN account? (after the period in the email address)

The reason the form specifically asks for the first and last name is because some names have to be modified in our systems due to length, hyphens, and/or entirely different preferred names.

This ensures that the VPN account details will match up evenly with the spelling of their company email address. This helps limit confusion and makes troubleshooting easier in the future if needed.

An additional benefit is that it consolidates all of the previous methods of requesting VPN account management into a single funnel.

Instead of simply replying to chat messages with the status of a VPN account (which ends up being lost in the shuffle), I can now point to one location for requests and share the result files with the IT department so anyone can see the status of an end user’s VPN account.

And in this format, it is easy to see what is going on and the date it occurred on (which I manually fill in).


Step Two – Deploy and Track

The next step is to refer to check the requests on the backend, create an account and password as needed, and then inform the requestor directly of the changes (through email). Even though in Step One, I stated that a requestor can check the backend to see the status of all VPN accounts since this system was setup, it is a fallback plan.

I don’t think any process should rely on someone manually checking a spreadsheet to see if their request was processed. So let’s walk though the next steps by looking at a a request on the backend.

The account we are working on today is Killua Zoldyck (the real ones know). I am NOT creating a company VPN account for Killua but highlighting the process works for a real VPN account request.

There are some things to note on the backend. I can send the date and time the request came in along with the name and email address of the requestor. That is important for the next step. Notice that the Password | Account Status and Completed Date are blank. I fill those in after I create the account.

Previously, I was creating the VPN passwords by hand using a system where I decided to take whatever was on my mind and then turn it into a password by counting the letters and adding the number after the word and then slapping on a exclamation point.

For example: Zero4Chill5! would be a VPN password

I ended up automating this password creation process by using Python and made a Windows installer to generate offline passwords on demand (Python Password Generator – Philadelphia Museum of Art).

For Killua’s account, let’s use the hypothetical password of Zero4Chill5! and plug it into the spreadsheet back end.

Now how to get that account information over to the requestor (me in this case) in the least steps as possible?

Enter Microsoft Flow (under Microsoft Automate) where I created an automation which emails that account status and password to the requestor with the click of one button directly from the spreadsheet on Excel Online. By simply highlighting the Password | Account Status cell, then clicking DATA on the Excel menu bar and clicking FLOW, my VPN Email option will appears.

The next screen confirms what the flow will be accessing (Excel Online and Office 365 Outlook in this case)

And here is a screenshot of the email I received from the Flow I started and finished all through Excel Online (with the template I created ahead of time):


Outcome

Currently, the Museum has over 250+ employees eligible for laptops and therefore VPN accounts. By streamlining the process, it saves collective hours between me and the rest of the IT Department, especially when it comes time to setup or replace hardware for new or current employees.

And this process can be modified easily for any other sort of requests which are quick in nature but can easily fall between the cracks. We have proper ticket systems to request New Hires for example but becomes too cumbersome for a simple request such as this one.

By removing the additional friction, it ensures that the IT Department (myself included) uses the form to keep our records straight. And even if someone requests a VPN account using the previous methods (a Teams chat request for example), I enter their request into this form so the request is recorded.

*NOTE: While I could have automated the entire process using Python and/or Microsoft Power Automate, I decided against since that meant the VPN admin credentials would have to be baked into the code and that’s no bueno.

Copyright © 2025 · Twenty Seven Pro on Genesis Framework · WordPress · Log in